Tuesday, September 11, 2012

Vsphere 5 New Features


1. Storage DRS

2. Storage I/O Control for NFS


3. VMFS-5


4. ESXi Firewall


5. VMFS Scalability and Performance enhancements


6. 2TB+ pass-through RDM support


7. vCenter inventory extensibility


8. Storage APIs -- VAAI T10 Compliancy


9. Storage APIs -- VAAI Offloads for NAS


10. Storage APIs -- VAAI Thin Provisioning


11. Storage APIs -- Storage Awareness/Discovery


12. Storage APIs -- Data Protection compatible with MN


13. APD, Permanent APD Survivability Enablement


14. Snapshot enhancements


15. Storage vMotion scalability improvements


16. iSCSI Enablement: iSCSI UI Support


17. iSCSI Enablement: Stateless Support


18. Multi-queue Storage IO adapters


19. Increase NFSv3 Max Share Count to 256


20. SATA 3.0


21. Software FCoE initiator support


22. Enhanced logging support


23. Enhanced Storage metrics


24. Profile-Driven Storage


25. Storage vMotion support for snapshots


26. vSphere Storage Appliance (VSA)


27. SSD Detection and Enablement


28. vSphere Replication


29. vSphere Data Recovery 2.0


30. VADP enhancements


31. vCenter Orchestrator (vCO) Enhancements


32. vCO -- Library extension and consolidation


33. vCO -- Scalability


34. Network I/O Control (NIOC) Phase 2


35. NIOC -- User Defined Resource Pools


36. NIOC -- HBR traffic type


37. NIOC -- 802.1p tagging


38. Network Traffic Stats for iOPS


39. Improvement to UDP and Multicast traffic types


40. New networking drivers for server enablement


41. vDS support for Port mirror, LLDP and NetFlow V5


42. vDS Manage Port Group UI enhancement


43. Hot-Insert/Remove of Filters


44. Enhanced vMotion Compatibility


45. Storage vMotion support for Linked Clones


46. vMotion scalability (dual-NIC & longer latency support)


47. vNetwork API enhancements


48. vNetwork Opaque Channel


49. Support for 8 10GbE Physical NIC ports per host


50. Add Host Resources MIB to SNMP offering


51. Metro vMotion


52. Host Profile for DRS to support Stateless ESX


53. HA interop with agent VMs


54. DRS/DPM interop with agent VMs


55. DRS enhancements for Maintenance Mode


56. Enhanced processor support for FT


57. vSphere 5.0 HA aka "FDM / Fault Domain Manager"


58. vSphere HA - Heartbeat Datastores


59. vSphere HA - Support for partitions of management network


60. vSphere HA - Default isolation response changed


61. vSphere HA - New Status information in UI


62. vSphere HA - IPv6 support


63. vSphere HA - Application Awareness API publicly available


64. Extensions to create special icons for VMs


65. ESX Agent Management


66. Solution Management Plugin


67. Next-Gen vSphere Client


68. Host Profiles Enhancements


69. vCenter enhancements for stateless ESXi


70. vCenter Server Appliance


71. vCenter: Support for FileManager and VirtualDiskManager APIs


72. Virtual Hardware - Smartcard support for vSphere


73. Virtual Hardware Version 8


74. Virtual HW v8 -- 1TB VM RAM


75. Virtual HW v8 -- 32-way Virtual SMP


76. Virtual Hw v8 -- Client-Connected USB Devices


77. Virtual HW v8 -- EFI Virtual BIOS


78. Virtual HW v8 -- HD Audio


79. Virtual Hw v8 -- Multi-core Virtual CPU Support UI


80. Virtual HW v8 -- New virtual E1000 NIC


81. Virtual HW v8 -- UI and other support


82. Virtual HW v8 -- USB 3.0 device support


83. Virtual HW v8 -- VMCI device enhancements


84. Virtual HW v8 -- xHCI


85. Support SMP for Mac OS X guest OS


86. Universal Passthrough (VMdirect path with vMotion support)


87. Guest Management Operations (VIX API)


88. Guest OS Support -- Mac OS X Server


89. VM Serial Port to Host Serial Port Redirection (Serial Port Pass-Through)


90. Passthrough/SR-IOV


91. VMware Tools Portability


92. VMRC Concurrent Connections enhancements


93. Scalability: 512 VMs per host


94. ESXCLI enhancements


95. Support SAN and hw-iSCSI boot


96. Hardware -- Interlagos Processor Enablement


97. Hardware -- SandyBridge-DT Processor Enablement


98. Hardware -- SandyBridge-EN Processor Enablement


99. Hardware -- SandyBridge-EP Processor Enablement


100. Hardware -- Valencia Processor Enablement


101. Hardware -- Westmere-EX Processor Enablement


102. Platform -- CIM Enhancements


103. Platform -- ESX i18n support


104. Host Power Management Enhancements


105. Improved CPU scheduler


106. Improved scalability of CPU (NUMA) scheduler


107. Memory scheduler improvements to support 32-way VCPU's


108. Swap to host cache


109. API enhancements to configure VM boot order


110. VMX swap


111. Support for ESXi On Apple XServe


112. Redirect DCUI to host serial port for remote monitoring and management


113. UEFI BIOS Boot for ESXi hosts


114. Scalability -- 160 CPU Threads (logical PCPUs) per host


115. Scalability -- 2 TB RAM per host


116. Scalability -- 2048 VCPUs per host


117. Scalability -- 2048 virtual disks per host


118. Scalability -- 2048 VMs per VMFS volume


119. Scalability -- 512 VMs per host


120. Stateless -- Host Profile Engine and Host Profile Completeness


121. Stateless -- Image Builder


122. Stateless -- Auto Deploy


123. Stateless -- Networking Host Profile Plugin


124. Stateless -- VIB Packaging Enhancement


125. Stateless -- VMkernel network core dump


126. Host profiles enhancements for storage configuration


127. Enhanced driver support for ESXi


128. Intel TXT Support


129. Memsched policy enhancements w.r.t. Java balloon


130. Native Driver Autoload support


131. Root password entry screen in interactive installer


132. vCenter Dump Collector


133. vCenter Syslog Collector


134. VMware Update Manager (VUM) enhancements


135. VUM -- Virtual Appliance enhancements


136. VUM -- vApp Support


137. VUM -- Depot management enhancements


138. vCLI enhancements


139. PowerCLI enhancements


140. VProbes -- ESX Platform Observability

Monday, September 10, 2012

Using VMware vCenter Operations Manager to pinpoint and solve issues


Takeaway: Lauren Malhoit walks us through a couple of demos of using VMware vCenter Operations Manager to pinpoint and then solve annoying problems.
I had the pleasure of attending VMware’s VMworld conference this past week in San Francisco and sat in on several sessions. One of my favorites was called Troubleshooting Using vCenter Operations Manager, given by Kit Colbert and Praveen Kannan. They did a live lab in the session that turned out really well and showed how useful vCenter Operations Manager can be. I thought I’d take this opportunity to share some of what they showed us in the lab.
Before we get started, it might be useful to share some introductory details on vCOPS (vCenter Operations Manager). It can be installed as a plug-in in your current vSphere environment. After some minimal configuration it will be up and running. vCOPS works best after it has been in the environment for at least a few weeks. Its usefulness does not necessarily lie in finding outright errors (although it can do that), but in finding anomalies in your environment. It “learns” the environment and can point out what is out of the norm. There are three core scores that are given on the main dashboard as shown in Figure A.

Figure A


VMware calls these core elements badges. There’s the health badge that shows immediate problems, the risk badge that shows future problems, and the efficiency badge that shows opportunities to optimize. There are then subcategories under each of these badges which contribute to the scores.
In the live demo, they offered up three scenarios to show the value of the tool. The first showed how to find what’s causing the slow performance of a workload as shown in the steps below.
  1. In the search field found in the upper-right corner, type in the name of the VM that is slow.
  2. Under the Alerts pane there is an option to filter by workload. Click on the workload filter.
  3. Find the workload alert and then click on it.
  4. From here you can see the symptoms, such as heavy disk I/O.
  5. Now click on the Operation Tab.
  6. Check out the Workload section and you can see that the datastore “skittle” (icon representing the datastore) is red.
  7. Click on the datastore skittle and click details.
  8. Click on the Analysis tab and select Storage as a focus area then filter by VM.
  9. You can see that the color is based on latency, and if your problem is storage latency you’ll see it in here.
  10. You can deduce that you either need faster storage or more spindles because the current datastore can’t handle the VM workload.
The next scenario dealt with capacity constraints. vCOPS can show you which of your VMs are undersized, meaning they don’t have enough memory, CPU, etc., configured. Here are the steps you can follow to find out if you have a sizing problem with your VMs:
  1. Search for the problematic VM by name.
  2. By looking at the dashboard you will be able to see the workload is very high and it’s hitting the memory pretty hard. Although you can see this right in the dashboard, you may want to see if this is a common issue with this machine.
  3. Click on the Planning Tab. then click on the Stress badge
  4. Here you’ll be able to see how much of the time memory has been undersized. So if your memory is showing that it’s been undersized for 80% of the time, it may be time to add more memory!
The last scenario was the most interesting to me. It demonstrated how you can find out which changes to a VM may have caused downtime. It’s such a useful thing to be able to narrow down, and even reverse, changes in one click if you have vCenter Configuration Manager. Here are the steps:
  1. Search for the problematic VM
  2. Click on the red VM skittle under the Operations tab.
  3. Click on the host of the VM and you’ll be able to see the CPU is showing as red.
  4. Click on the CPU
  5. Click on the Events tab
  6. There is a time window that can be changed if necessary. You’ll want to look for the time where the graph changes from green to red. This is most likely when the change was made to your VM.
  7. Drill in to where the change is and look at the events list.
  8. In the events list, you’ll be able to see if something was installed, like an antivirus. This installation or restart, etc., will most likely be the reason the CPU kept spiking and started showing red in vCOPS.  As mentioned above, if you combine this with vCenter Configuration Manager, you can actually find out which user made the change and roll it back in one click!

Tuesday, July 3, 2012

VMware's First Cloud Certification


VMware's First Cloud Certification

By: David Davis From http://blogs.vmware.com/vcloud/2012/07/vmwares-first-cloud-certification.html
Recently VMware’s first certification around cloud computing quietly went into beta. Let’s learn more about this new certification option, the VCP-Infrastructure as a Service (or VCP-IaaS) certification…

Top 10 Must-Knows for the New VCP-IaaS

As this certification is still in beta, as of today, we don’t have a lot of official information yet but here’s what we do know:
  1. VMware Education confirmed the existence of this new certification on their blog, here.
  2. The VCP-IaaS will focus on Installing, Configuring, and Administering Infrastructure as a Service clouds based on vCloud Director.
  3. It’s expected to be launched in late-July.
  4. It requires that you already have a VCP so it’s the second form of the VCP with the VCP-DT being the other.
  5. According to Eric Sloof from NTPRO.NL, the current beta exam consists of 115 questions and a short pre-exam survey consisting of 8 questions. The passing score for this exam is 300, using a scaled scoring method. Eric said that the scoring scale ranges from 100 to 500.
  6. Also according to Eric, “Candidates interested in this certification should be capable of installing and configuring vCloud Director and related components, utilizing vCD to create and manage vApps, Service Catalogs, Organization/provider VDCs, and administering cloud enabled networking and storage.”
  7. If you don’t already have your VCP5, that is where you need to start on your way to this new VMware vCloud certification.
  8. If you do have your VCP5 then I recommend that you get started learning vCloud Director by trying out either myTrainSignal vCloud Director Essentials video training course or the VMware Education vCloud Director Fundamentals course.
  9. You can try vCloud Director (and vSphere with vCenter) FREE for 60 days, here.
  10. If you are already a vSphere user, vCloud solutions – either via private cloud with vCloud Director or public cloud through vCloud providers – are what you need to be considering next.
To sign up to receive notification when the new VCP-IaaS is publicly available, click here.

My Take on the VCP-IaaS

I am super-excited about the VCP-IaaS and look forward to its public release. One of the best ways for the some 100,000+ VCPs out there to learn about vCloud Director is to do it through a certification program. As vCloud Director becomes more prolific in the datacenters of today, look for more great blog posts, certifications, books, and video training about it (in fact, I know of a vExpert current producing an upcoming vCloud Director Organizational Admin video training course). VMware is smart to create their first cloud certification and I hope that they won’t stop there and decide to follow this up with a VCAP and VCDX on cloud infrastructure and vCloud Director. Exciting times!
Note: I’ll be following up with more information about the VCP-IaaS on this blog as soon as it is released. To stay up to date, be sure to follow @vCloud on Twitter.
David Davis is a VMware Evangelist and vSphere Video Training Author for Train Signal. He has achieved CCIE, VCP,CISSP, and vExpert level status over his 15+ years in the IT industry. David has authored hundreds of articles on the Internet and nine different video training courses for TrainSignal.com including the popular vSphere 5 and vCloud Director video training courses. Learn more about David at his blog or on Twitter and check out a sample of his VMware vSphere video training course from TrainSignal.com.

Thursday, June 7, 2012

VMware vSphere Fault Tolerance

VMware Fault Tolerance (FT) is a new feature that is available with vSphere 4.0. VMware FT is based on vLockstep technology and aims to provide zero downtime, zero data loss, and continuous availability for applications. FT provides this continuous availability for applications by creating a secondary, live shadow instance of a virtual machine (VM) that is in virtual lockstep with the primary VM instance.

Next, VMware FT builds on VMware High Availability (HA). Therefore, HA has to be running correctly in order to enable FT. VMware FT can be turned on or off for individual virtual machines with a click of the mouse. In addition, since it leverages existing VMware HA clusters with a maximum node limit of 16 servers, any number of virtual machines in the cluster can be protected with VMware FT.

Finally, if you have set up VMware HA cluster and meet the Prerequisites and Requirements below, enabling FT is only a few mouse clicks away. Check out the step-by-step screen captures of enabling FT and testing failover with FT enabled at FT Example Down Below.


VMware vSphere FT Prerequisites


For VMware FT to perform as expected, it must run in an environment that meets specific requirements.
  • The primary and secondary fault-tolerant virtual machines must be in a VMware HA cluster.
  • Primary and secondary virtual machines must not run on the same host. FT automatically places the secondary virtual machine on a different host.
  • Virtual machine files must be stored on shared storage.
  • Shared storage solutions include NFS, FC, and iSCSI.
  • For virtual disks on VMFS-3, the virtual disks must be thick, meaning they cannot be thin or sparsely allocated.
  • Turning on VMware FT automatically converts the virtual machine to thick-eager zeroed disks.
  • Virtual Raw Disk Mapping (RDM) is supported. Physical RDM is not supported.
  • Multiple gigabit Network Interface Cards (NICs) are required.
  • A minimum of two VMKernel Gigabit NICs must be dedicated to VMware FT Logging and vMotion.
  • The FT Logging interface is used for logging events from the primary virtual machine to the secondary FT virtual machines.
  • For best performance, use 10Gbit NIC rather than 1Gbit NIC, and enable the use of jumbo frames.
  • VMware FT requires that Hardware Virtualization (HV) be turned on in the BIOS. The process for enabling HV varies among BIOSs. Contact your vendor for specifics.

VMware vSphere FT Requirements


There are a number of requirements which must be met before FT can be set up:
  • CPUs: limited processors must be the same family (no mix/match).
  • Requires Intel 31xx, 33xx, 52xx, 54xx, 55xx, 74xx or AMD 13xx,23xx, 83xx series of processors.
  • SMP virtual machines are not supported.
  • Hardware Virtualization must be enabled in the BIOS.
  • Hosts must be in a VMware High Availability-enabled cluster.
  • Storage: shared storage (FC, iSCSI, or NAS).
  • Network: minimum of 3 NICs for various types of traffic (ESX Management/VMotion, virtual machine traffic, FT logging).
  • GigE required for vMotion and FT logging.
  • Minimized single points of failures in the environment. For example, NIC teaming, multiple network switches, storage multipathing.
  • Primary and secondary hosts must be running the same build of ESX.

http://kb.vmware.com/selfservice/microsites/search.do?cmd=displayKC&docType=kc&externalId=1010601&sliceId=1&docTypeID=DT_KB_1_1&dialogID=29660642&stateId=1%200%2029664181

Guest Operating Systems
The following table displays guest operating system support for VMware FT. For specific guest operating system version information, see the Guest Operating System Installation Guide at http://www.vmware.com/pdf/GuestOS_guide.pdf.
The following values appear in the table:
  • Yes - Virtual machine can be FT-enabled while powered on.
  • Yes/Off - Virtual machine must be powered off before FT is enabled.
  • No - Not supported by VMware FT.
Guest Operating System
Fault Tolerance Support
with Intel Xeon Based on 45nm Core 2 Microarchitecture
Fault Tolerance Support
with Intel Xeon Based on Core i7 Microarchitecture
Fault Tolerance Support
with AMD 3rd Generation Opteron
Windows Server 2008 Yes Yes/Off Yes/Off
Windows Vista Yes Yes/Off Yes/Off
Windows Server 2003 (64 bit) Yes Yes/Off
Yes/Off
Windows Server 2003 (32 bit) Yes Yes/Off
Yes/Off
(Requires Service Pack 2 or greater)
Windows XP (64 bit) Yes Yes/Off Yes/Off
Windows XP (32 bit) Yes Yes/Off No
Windows 2000 Yes/Off Yes/Off No
Windows NT 4.0 Yes/Off Yes/Off No
Linux (all ESX-supported distributions) Yes Yes/Off Yes/Off
Netware Server Yes/Off Yes/Off Yes/Off
Solaris 10 (64-bit) Yes Yes/Off
Yes/Off
(Requires Solaris U1)
Solaris 10 (32-bit) Yes Yes/Off No
FreeBSD (all ESX-supported distributions) Yes Yes/Off Yes/Off
http://kb.vmware.com/selfservice/microsites/search.do?language=en_US&cmd=displayKC&externalId=1008027


VMware vSphere FT Step by Step Example


1. Image depicting the Network configuration.


FT-Networking

2. Turning on FT.

FT-TurnOn

3. 54% through setting up FT.

FT-54percentFT

4. FT setup complete.

FT-TurnOnComplete

5. vLockstep Interval and Log Bandwidth information are now updated.

FT-vLocknBW

6. Primary VM is located on 10.10.10.146.

FT-TestFAbefore1

7. Secondary VM is running on the Secondary Host- 10.10.10.145.

FT-TestFAbefore2

8. Testing FT using the built in Test Failover command.

FT-TestFA

9. Failover test completes. Notice that 10.10.10.146 has become the secondary location.

FT-TestComplete

10. After the Failover Test, the primary host server is now 10.10.10.145 and the primary VM is running on it.

FT-TestFAafterComplete1

11. Furthermore, after the Failover Test, the secondary VM runs on the secondary host server, 10.10.10.146.

FT-TestFAafterComplete2

12. Failover test completion will result in showing the primary VM on the new primary host server and the new secondary host server with the accompanying vLockstep Interval and Log Bandwidth.

FT-TestComplete

13. Finally, VMware vSphere FT is ready to provide continuous protection to your VMs.
 

Tuesday, June 5, 2012

VMware ESXi 4: How to Add VMFS Datastore Using vSphere Client ( with Screenshots )

VMware ESXi 4: How to Add VMFS Datastore Using vSphere Client ( with Screenshots )

1. View Existing ESXi VMware Datastores
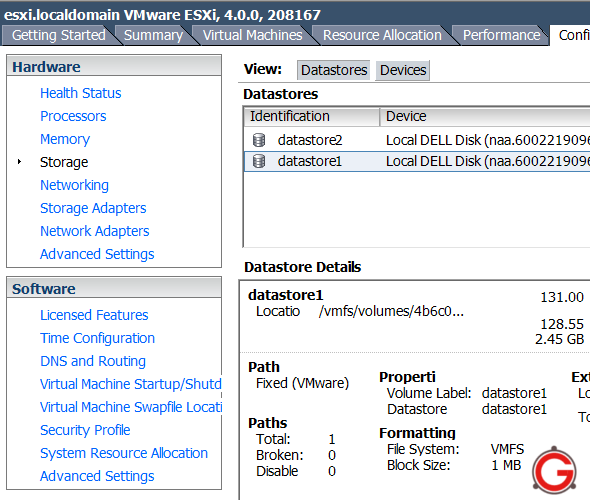
Launch vSphere Client -> Click on the top node in the left tree -> Configuration tab -> Click on the storage menu item under “Hardware” section, as shown below. This storage section, will display all available VMware datastores as shown below.
Fig: Vmware ESX Datastores
For example, the current VMware datastore1 on this ESXi server has following information.
  • Volume Label ( Datastore ): datastore1
  • device: locall dell disk ( naa.xxxx )
  • Capacity: 131 G
  • Free: 2.45 GB
  • File system: vmfs3
Please note that the VMS file system can be created across multiple partitions to form one logical VMFS volume.

2. Create VMFS Datastore – Select ESX Storage Type

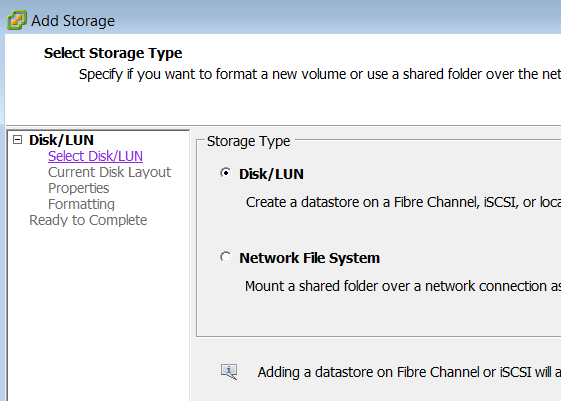
Click on ‘Add Storage..’ link on the top right hand corner, which will display the “Add Storage” wizard.
The first step is to specicy the esx storage type for the new ESX VMFS datastore. Select Disk/LUN as shown below. (other option is to select network file system – nfs datastore)
Fig: Select ESXi Storage Type – Disk/LUN

3. Select Disk/LUN

This step will display all the available disk groups on the server. This is a dell poweredge 2950 server, which already has a raid-1 logical disk group created at the hardware raid level. The raid-1 diskgroup that was created at the hardware level is now visible to the ESXi server. If you have more than one diskgroup available to the hardware, they’ll be listed here.
Fig: vSphere VMware Select disk

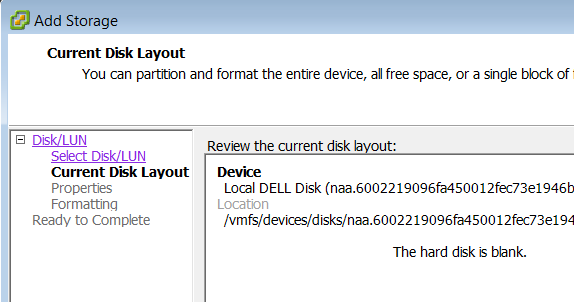
4. Current Disk Layout Configuration

This is only a information screen that says that the hard disk is blank etc.,. Click on Next to continue
Fig: VMware VMFS Disk Layout Configuration

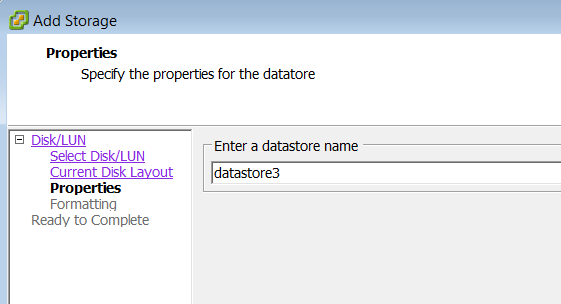
5. VMFS Datastore Name

Specify the VMFS datastore name in the properties screen.
Fig: VMFS datastore Name

6. Disk/LUN Formatting

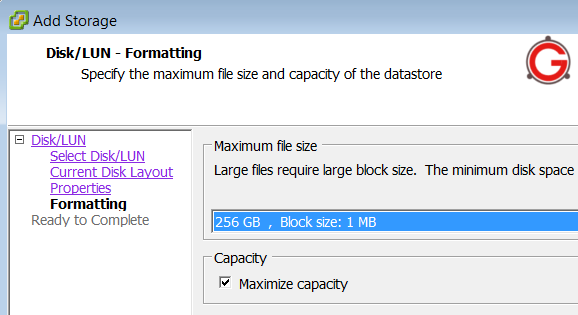
Specify the maximum file size for this esx datastore. In this example, I selected 256GB as maximum file size with 1MB block size. Following options are available for the maximum file size:
  • 256 GB, Block size: 1 MB
  • 512 GB, Block size: 2 MB
  • 1024 GB, Block size: 4 MB
  • 2048 GB, Block size: 8 MB
Leave the capacity check-box as maximum capacity.
Fig: VMware Datastore Disk Formatting

7. Final confirmation – Ready to Complete

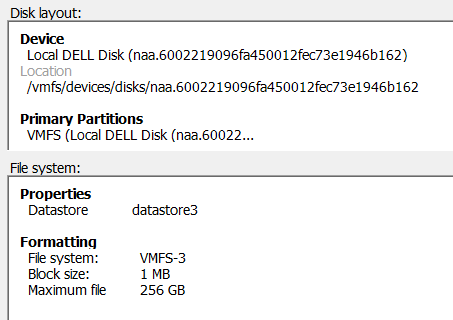
The final confirmation section confirms our selection as shown below.
Fig: VMware Datastore creation confirmation

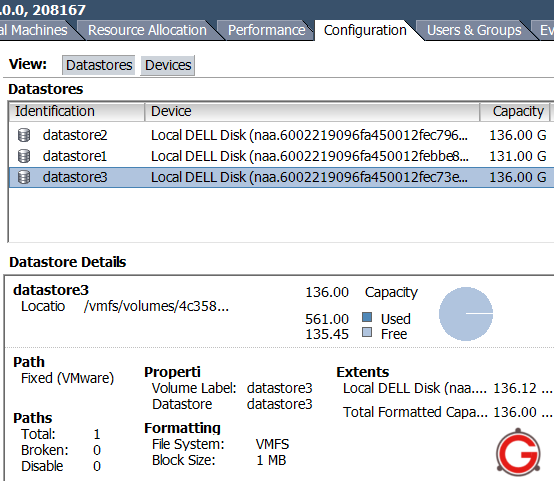
8. New ESX datastore Created

The new datastore3 is created as shown below.

Wednesday, May 30, 2012

VMware Fault Tolerance

  • VMware Fault Tolerance: What it is and how it works
  • New SiteSurvey utility from VMware checks for Fault Tolerance compatibility
  • More details on VMware’s Fault Tolerance feature

I. And VMware said, ‘Let there be Fault Tolerance’
Fault Tolerance was introduced as a new feature in vSphere that provided something that was missing in VMware Infrastructure 3 (VI3), the ability to have continuous availability for a virtual machine in case of a host failure. High Availability (HA) was a feature introduced in VI3 to protect against host failures, but it caused the VM to go down for a short period of time while it was restarted on another host. FT takes that to the next level and guarantees the VM stays operational during a host failure by keeping a secondary copy of it running on another host server. If a host fails, the secondary VM becomes the primary VM and a new secondary is created on another functional host.
The primary VM and secondary VM stay in sync with each other by using a technology called Record/Replay that was first introduced with VMware Workstation. Record/Replay works by recording the computer execution on a VM and saving it as a log file. It can then take that recorded information and replay it on another VM to have a replica copy that is a duplicate of the original VM.


II. Power to the processors
The technology behind the Record/Replay functionality is built in to certain models of Intel and AMD processors. VMware calls it vLockstep. This technology required Intel and AMD to make changes to both the performance counter architecture and virtualization hardware assists (Intel VT and AMD-V) that are inside the physical processors. Because of this, only newer processors support the FT feature. This includes the third-gen AMD Opteron based on the AMD Barcelona, Budapest and Shanghai processor families, and Intel Xeon processors based on the Penryn and Nehalem micro-architectures and their successors. VMware has published a knowledgebase article that provides more details on this.


III. But how does it do that?
FT works by creating a secondary VM on another ESX host that shares the same virtual disk file as the primary VM, and then transferring the CPU and virtual device inputs from the primary VM (record) to the secondary VM (replay) via a FT logging network interface card (NIC) so it is in sync with the primary VM and ready to take over in case of a failure. While both the primary and secondary VMs receive the same inputs, only the primary VM produces output such as disk writes and network transmits. The secondary VM’s output is suppressed by the hypervisor and is not on the network until it becomes a primary VM, so essentially both VMs function as a single VM.
It’s important to note that not everything that happens on the primary VM is copied to the secondary VM. There are certain actions and instructions that are not relevant to the secondary VM, and to record everything would take up a huge amount of disk space and processing power. Instead, only non-deterministic events are recorded, which include inputs to the VM (disk reads, received network traffic, keystrokes, mouse clicks, etc.,) and certain CPU events (RDTSC, interrupts, etc.). Inputs are then fed to the secondary VM at the same execution point so it is in exactly the same state as the primary VM.
The information from the primary VM is copied to the secondary VM using a special logging network that is configured on each host server. This requires a dedicated gigabit NIC for the FT Logging traffic (although not a hard requirement, this is highly recommended). You could use a shared NIC for FT Logging for small or test/dev environments and for testing the feature. The information that is sent over the FT Logging network between the host can be very intensive depending on the operation of the VM.
VMware has a formula that you can use to determine this:
VMware FT logging bandwidth ~= (Avg disk reads (MB/s) x 8 + Avg network input (Mbps)) x 1.2 [20% headroom]
To get the VM statistics needed for this formula you need to use the performance metrics that are supplied in the vSphere client. The 20% headroom is to allow for CPU events that also need to be transmitted and are not included in the formula. Note that disk or network writes are not used by FT as these do not factor in to the state of the virtual machine.

As you can see, disk reads will typically take up the most bandwidth. If you have a VM that does a lot of disk reading you can reduce the amount of disk read traffic across the FT Logging network by using a special VM parameter. By adding a replay.logReadData = checksum parameter to the VMX file of the VM, this will cause the secondary VM to read data directly from the shared disk, instead of having it transmitted over the FT logging network. For more information on this see this knowledgebase article.

IV. Every rose has its thorn
While Fault Tolerance is a useful technology, it does have many requirements and limitations that you should be aware of. Perhaps the biggest is that it currently only supports single vCPU VMs, which is unfortunate as many big enterprise applications that would benefit from FT usually need multiple vCPU’s (vSMP). Don’t let this discourage you from running FT, however, as you may find that some applications will run just fine with one vCPU on some of the newer, faster processors that are available as detailed here. Also, VMware has mentioned that support for vSMP will come in a future release. It’s no easy task trying to keep a single vCPU in lockstep between hosts and VMware developers need more time to develop methods to try and keep multiple vCPUs in lockstep between hosts. Additional requirements for VMs and hosts are as follows:
Host requirements:
  • CPUs: Only recent HV-compatible processors (AMD Barcelona+, Intel Harpertown+), processors must be the same family
  • All hosts must be running the same build of VMware ESX
  • Storage: shared storage (FC, iSCSI, or NAS)
  • Hosts must be in an HA-enabled cluster
  • Network and storage redundancy to improve reliability: NIC teaming, storage multipathing
  • Separate VMotion NIC and FT logging NIC, each Gigabit Ethernet (10 GB recommended). Hence, minimum of 4 NICs (VMotion, FT Logging, two for VM traffic/Service Console)
  • CPU clock speeds between the two ESX hosts must be within 400 Mhz of each other.
VM requirements:
  • VMs must be single-processor (no vSMP)
  • All VM disks must be “thick” (fully-allocated) and not thin; if a VM has a thin disk it will be converted to thick when FT is enabled.
  • No non-replayable devices (USB, sound, physical CD-ROM, physical floppy, physical Raw Device Mappings)
  • Make sure paravirtualization is not enabled by default (Ubuntu Linux 7/8 and SUSE Linux 10)
  • Most guest operating systems are supported with the following exceptions that apply only to hosts with third generation AMD Opteron processors (i.e. Barcelona, Budapest, Shanghai): Windows XP (32-bit), Windows 2000, Solaris 10 (32-bit). See this KB article for more.
In addition to these requirements your hosts must also be licensed to use the FT feature, which is only included in the Advanced, Enterprise and Enterprise Plus editions of vSphere.

V. How to use Fault Tolerance in your environment
Now that you know what FT does, you’ll need to decide how you will use it in your environment. Because of high overhead and limitations of FT you will want to use it sparingly. FT could be used in some cases to replace existing Microsoft Cluster Server (MSCS) implementations, but it’s important to note what FT does not do, which is to protect against application failure on a VM. It only protects against a host failure.
If protection for application failure is something you need, then a solution like MSCS would be better for you. FT is only meant to keep a VM running if there is a problem with the underlying host hardware. If protecting against an operating system failure is something you need, than VMware High Availability (HA) is what you want, as it can detect unresponsive VMs and restart them on the same host server.
FT and HA can be used together to provide maximum protection. If both the primary host and secondary host failed at the same time, HA would restart the VM on another operable host and spawn a new secondary VM.

VI. Important notes
One important thing to note: If you experience an OS failure on the primary VM, like a Windows Blue Screen Of Death (BSOD), the secondary VM will also experience the failure as it is an identical copy of the primary. The HA virtual machine monitor  will detect this, however, restart the primary VM, and then spawn a new secondary VM.
Another important note: FT does not protect against a storage failure. Since the VMs on both hosts use the same storage and virtual disk file it is a single point of failure. Therefore it’s important to have as much redundancy as possible to prevent this, such as dual storage adapters in your host servers attached to separate switches, known as multi-pathing). If a path to the SAN fails on one host, FT will detect this and switch over to the secondary VM, but this is not a desirable situation. Furthermore if there was a complete SAN failure or problem with the VM’s LUN, the FT feature would not protect against this.

VII. So should you actually use FT? Enter SiteSurvey
Now that you’ve read all this, you might be wondering if you meet the many requirements to use FT in your own environment. VMware provides a utility called SiteSurvey that will look at your infrastructure and see if it is capable of running FT. It is available as either a Windows or Linux download and once you install and run it, you will be prompted to connect to a vCenter Server. Once it connects to the vCenter Server you can choose from your available clusters to generate a SiteSurvery report that shows whether or not your hosts support FT and if the hosts and VMs meet the individual prerequisites to use the feature.
You can also click on links in the report that will give you detailed information about all the prerequisites along with compatible CPU charts. These links go to VMware’s website and display the help document for the SiteSurvey utility, which is full of great information, including some of the following prerequisites for FT.
  • The vLockstep technology used by FT requires the physical processor extensions added to the latest processors from Intel and AMD. In order to run FT, a host must have an FT-capable processor, and both hosts running an FT VM pair must be in the same processor family.
  • When ESX hosts are used together in an FT cluster, their processor speeds must be matched fairly closely to ensure that the hosts can stay in sync. VMware SiteSurvey will flag any CPU speeds that are different by more than 400 MHz.
  • ESX hosts running the FT VM pair must be running at least ESX 4.0, and must be running the same build number of ESX.
  • FT requires each member of the FT cluster to have a minimum of two NICs with speeds of at least 1 Gb per second. Each NIC must also be on the same network.
  • FT requires each member of the FT cluster to have two virtual NICs, one for logging and one for VMotion. VMware SiteSurvey will flag ESX hosts which do not contain as least two virtual NICs.
  • ESX hosts used together as a FT cluster must share storage for the protected VMs. For this reason VMware SiteSurvey lists the shared storage it detects for each ESX host and flags hosts that do not have shared storage in common. In addition, a FT-protected VM must itself be stored on shared storage and any disks connected to it must be shared storage.
  • At this time, FT only supports single-processor virtual machines. VMware SiteSurvey flags virtual machines that are configured with more than one processor. To use FT with those VMs, you must reconfigure them as single-CPU VMs.
  • FT will not work with virtual disks backed with thin-provisioned storage or disks that do not have clustering features enabled. When you turn on FT, the conversion to the appropriate disk format is performed by default.
  • Snapshots must be removed before FT can be enabled on a virtual machine. In addition, it is not possible to take snapshots of virtual machines on which FT is enabled.
  • FT is not supported with virtual machines that have CD-ROM or floppy virtual devices backed by a physical or remote device. To use FT with a virtual machine with this issue, remove the CD-ROM or floppy virtual device or reconfigure the backing with an ISO installed on shared storage.
  • Physical RDM is not supported with FT. You may only use virtual RDMs.
  • Paravirtualized guests are not supported with FT. To use FT with a virtual machine with this issue, reconfigure the virtual machine without a VMI ROM.
  • N_Port ID Virtualization (NPIV) is not supported with FT. To use FT with a virtual machine with this issue, disable the NPIV configuration of the virtual machine.
Below is some sample output from the SiteSurvey utility showing host and VM compatibility with FT and what features and components are compatible or not:


Another method for checking to see if your hosts meet the FT requirements is to use the vCenter Server Profile Compliance tool. To use this method, select your cluster in the left pane of the vSphere Client, then in the right pane select the Profile Compliance tab. Click the Check Compliance Now link and it will begin checking your hosts for compliance including FT as shown below:


VIII. Are we there yet? Turning on Fault Tolerance
Once you meet the requirements, implementing FT is fairly simple. A prerequisite for enabling FT is that your cluster must have HA enabled. You simply select a VM in your cluster, right-click on it, select Fault Tolerance and then select “Turn On Fault Tolerance.”

A secondary VM will then be created on another host. Once it’s complete you will see a new Fault Tolerance section on the Summary tab of the VM that will display information including FT status, secondary VM location (host), CPU and memory in use by the secondary VM, the secondary VM lag time (how far behind the primary it is in seconds) and the bandwidth in use for FT logging.

Once you have enabled FT there are alarms available that you can use to check for specific conditions such as FT state, latency, secondary VM status and more.

VIII. Fault Tolerance tips and tricks
Some additional tips and tidbits that will help you understand and implement FT are listed below.
  • Before you enable FT be aware of one important limitation, VMware currently recommends that you do not use FT in a cluster that consists of a mix of ESX and ESXi hosts. The reason is that ESX hosts might become incompatible with ESXi hosts for FT purposes after they are patched, even when patched to the same level. This is a result of the patching process and will be resolved in a future release so that compatible ESX and ESXi versions are able to interoperate with FT even though patch numbers do not match exactly. Until this is resolved you will need to take this into consideration if you plan on using FT and make sure you adjust your clusters that will have FT enabled VMs so they only consist of only ESX or ESXi hosts and not both.
  • VMware spent a lot of time working with Intel/AMD to refine their physical processors so VMware could implement its vLockstep technology, which replicates non-deterministic transactions between the processors by reproducing the CPU instructions on the other processor. All data is synchronized so there is no loss of data or transactions between the two systems. In the event of a hardware failure you may have an IP packet retransmitted, but there is no interruption in service or data loss as the secondary VM can always reproduce execution of the primary VM up to its last output.
  • FT does not use a specific CPU feature but requires specific CPU families to function. vLockstep is more of a software solution that relies on some of the underlying functionality of the processors. The software level records the CPU instructions at the VM level and relies on the processor to do so; it has to be very accurate in terms of timing and VMware needed the processors to be modified by Intel and AMD to ensure complete accuracy. The SiteSurvey utility simply looks for certain CPU models and families, but not specific CPU features, to determine if a CPU is compatible with FT. In the future, VMware may update its CPU ID utility to also report if a CPU is FT capable.
  • Currently there is a restriction that hosts must be running the same build of ESX/ESXi; this is a hard restriction and cannot be avoided. You can use FT between ESX and ESXi as long as they are the same build. Future releases may allow for hosts to have different builds.
  • VMotion is supported on FT-enabled VMs, but you cannot VMotion both VMs at the same time. Storage VMotion is not supported on FT-enabled VMs. FT is compatible with Distributed Resource Scheduler (DRS) but will not automatically move the FT-enabled VMs between hosts to ensure reliability. This may change in a future release of FT.
  • In the case of a split-brain scenarios (i.e. loss of network connectivity between hosts) the secondary VM may try and become the primary resulting in two primary VMs running at the same time. This is prevented by using a lock on a special FT file; once a failure is detected both VMs will try and rename this file, and if the secondary succeeds it becomes the primary and spawns a new secondary. If the secondary fails because the primary is still running and already has the file locked, the secondary VM is killed and a new secondary is spawned on another host.
  • You can use FT on a vCenter Server running as a VM as long as it is running with a single vCPU.
  • There is no limit to the amount of FT-enabled hosts in a cluster, but you cannot have FT-enabled VMs span clusters. A future release may support FT-enabled VMs spanning clusters.
  • There is an API for FT that provides the ability to script certain actions like disabling/enabling FT using PowerShell.
  • The four FT-enabled VM limit is per host, not per cluster, and is not a hard limit, but is recommended for optimal performance.
  • The current version of FT is designed to be used between hosts in the same data center, and is not designed to work over wide area network (WAN) links between data centers due to latency issues and failover complications between sites. Future versions may be engineered to allow for FT usage between external data centers.
  • Be aware that the secondary VM can slow down the primary VM if it is not getting enough CPU resources to keep up. This is noticeable by a lag time of several seconds or more. To resolve this try setting a CPU reservation on the primary VM which will also be applied to the secondary VM and will ensure they will run at the same CPU speed. If the secondary VM slows down to the point that it is severely impacting the performance of the primary VM, FT between the two will cease and a new secondary will be found on another host.
  • When FT is enabled any memory limits on the primary VM will be removed and a memory reservation will be set equal to the amount of RAM assigned to the VM. You will be unable to change memory limits, shares or reservations on the primary VM while FT is enabled.
  • Patching hosts can be tricky when using the FT feature because of the requirement that the hosts must have the build level. There are two methods you can use to accomplish this. The simplest method is to temporarily disable FT on any VMs that are using it, update all the hosts in the cluster to the same build level and then reenable FT on the VMs. This method requires FT to be disabled for a longer period of time; a workaround if you have four or more hosts in your cluster is to VMotion your FT enabled VMs so they are all on half your ESX hosts. Then update the hosts without the FT VMs so they are the same build levels. Once that is complete disable FT on the VMs, VMotion them to the updated hosts, reenable FT and a new secondary will be spawned on one of the updated hosts that has the same build level. Once all the FT VMs are moved and reenabled, update the remaining hosts so they are the same build level, and then VMotion the VMs so they are balanced among your hosts.

IX. And there’s more! Additional resources
We’ve provided you with a lot of information on the new FT feature that should help you understand how it works, how to set it up ,and how use it. For even more information on FT you can check out the following resources:
VMware White Papers:
Documentation:
Multimedia:
Utilities
VMworld sessions:
Additional Information:
VMware KB Articles:

Saturday, May 26, 2012


How do I use das.isolationaddress[x]?

by Duncan Epping

Recently I received a question on twitter how the vSphere HA advanced option "das.isolationaddress" should be used. This setting is used when there is the desire or a requirement to specify an additional isolation address. The isolation address is used by a host which "believes" it is isolated. In other words, if a host isn't receiving heartbeats anymore it pings the isolation address to validate if it still has network access or not. If it does still have network access (response from isolation address) then no action is taken, if the isolation address does not respond then the "isolation response" is triggered.
Out of the box the "default gateway" is used as an isolation address. In most cases it is recommended to specify at least one extra isolation address. This would be done as follows:
  • Right click your vSphere Cluster and select "Edit settings"
  • Go to the vSphere HA section and click "Advanced options"
  • Add "das.isolationaddress0" under the option column
  • And add the "IP Address" of the device you want to use as an isolation address under the value column
Now if you want to specify another isolation address you should add "das.isolationaddress1". In total 10 isolation addresses will be used. Keep in mind that all of these will be pinged in parallel! Many seem to be under the impression that this happens sequential, but that is not the case!
Now if for whatever reason the default gateway should not be used you could disable this by adding the "das.usedefaultisolationaddress" to "false". A usecase for this would be when the default gateway is a "non-pingable" device, in most scenarios it is not needed though to use "das.usedefaultisolationaddress".
I hope this helps when implementing your cluster,